Need any help or advice?![]() +44 (0)1782 454499
+44 (0)1782 454499
PRODUCTS USED IN THIS PROJECT
Although not necessarily an exhaustive list, the following tools and materials, supplied by Easy Composites, were used in this project.
The quantity shown below is the approximate amount used in the project rounded up to the nearest available kit size or quantity.
MATERIALS & CONSUMABLES

REINFORCEMENTS
VIDEO TUTORIAL
How to Repair a Damaged Carbon Fibre Fishing Pole
Despite the strength and durability of carbon fibre fishing poles and fishing rods, fractures or complete breaks in the pole do happen from time to time.
We have created this how to repair a carbon fibre fishing pole guide to accompany our Fishing Pole Repair Kit product but, providing you have all the necessary materials mentioned in this guide there is no reason why it cannot be followed by anyone. If you do want to purchase the kit that accompanies this guide then see the link at the end of the article.
TUTORIAL BREAKDOWN
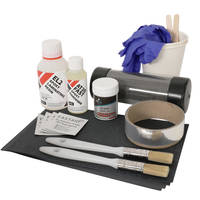
1. What we will need to make the repair
Everything listed below is included in the Easy Composites Fishing Pole Repair Kit
- 150mm x 1000mm ProFinish plain weave carbon 90g carbon fibre fabric
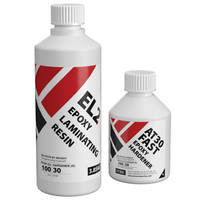
- 154g Epoxy resin
- 46g Epoxy hardener
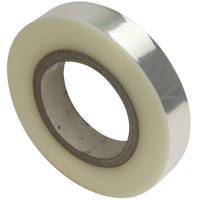
- 10 metre, Hi Shrink composites heat shrink tape
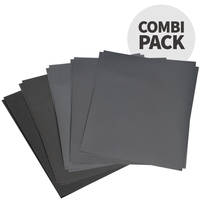
- 120, 240, 400 and 800 grit abrasive paper
- 2x laminating brushes, mixing cups and sticks
- Polishing Compound
- 3x Alcohol Wipes
Please note, we have upgraded our Fishing Pole Repair Kit to use a very special light weight and stabilised ProFinish 90gsm carbon fabric allowing very light repairs (0.3mm thick) to be made, if required. The resin system has also been updated to the EL2, so please be aware that the mix ratio has now changed to 100:30
2. What can be repaired?
Use this process to add strength to a fractured or weakened section of pole or rod, re-join a pole or rod that has been completely broken in two or patch over a hole in a pole.
3. Before you begin - using a jig for poles that are broken in two
Where a pole has been completely broken in two it will probably be necessary to 'jig' the pole or rod to hold the two sections of pole together whilst the repair is made. Supporting the pole in this way, so as to allow access all around the pole whilst the repair is made, is best done using a simple jig which will need to be constructed following the plans at the end of this guide before you start the repair.
4. Use abrasive paper to key up repair area
Use a small piece of the 120grit abrasive paper to roughen up the surface of the rod or pole around the area where the carbon fibre 'bandage' will be wrapped. This provides a good 'key' for the repair to bond to. Typically, you will be applying the bandage in an area of 60mm (2") beyond the edge of any damage. Make sure you do this to both halves of a pole that is broken in two.
5. De-grease repair area with alcohol wipe
Use one of the small alcohol wipes to wipe down the whole of the repair area. This ensures that you remove any grease from your fingers that will prevent the resin from bonding properly to the rod or pole.
6. Align pole (if necessary) using jig
If you are repairing a pole that has been broken in two you will need to align and support the two halves of the pole either side of where the repair will be made.
To do this we suggest constructing a jig as shown in the plans at the end of this guide. Having made your simple jig, secure the two halves of the pole and ensure they are correctly aligned.
7. Mix resin for ‘tack’ layer
The resin system has also been updated to the EL2, so please be aware that the mix ratio has now changed to 100:30
Next we will apply a thin layer of resin to the pole and allow it to cure to a tack. This will give us a sticky surface to apply the carbon too in a later stage.
Using one of the cups provided, accurately mix a very small amount of resin with hardener at a ratio of 100 parts resin to 30 part hardener. It is very important that this ratio is adhered to as closely as possible.
33g of resin and 10g of hardener should be about right for an average sized repair.
Take your time and mix the resin thoroughly. Any unmixed resin will not cure. It is a good practice to transfer the mixed resin to another container before using it. This avoids the risk of applying unmixed resin from the sides of the mixing cup to the repair.
8. Set aside to cure for around 4hrs
You now need to wait for around 4hrs (slightly more or less in warm or cold environments) for the first coat of resin to almost cure. When the resin is firm but still tacky (i.e. you can get a fingernail into it but it’s not wet on your finger) then you’re ready to continue.
9. Cut carbon fibre for repair bandage
Use a pair of normal household scissors to cut a section of the carbon fibre fabric to a size that will allow you to extend it about 60mm past either side of the damaged area. You then need to allow sufficient fabric to run approximately 3 times around the tube or rod. This will result in a repair of around 0.75mm in thickness.
10. Wrap carbon fibre around the pole
Taking the piece of cut carbon fibre fabric, align the fabric along the pole and press the leading edge of it onto the tacking resin.
Press it down with your fingers so that it grips firmly. Wrap the carbon once around the pole and leave the excess hanging down.
11. Wet-out fabric with a new mix of resin
Using a new cup accurately mix a slightly larger amount of resin and appropriate amount of hardener at a ratio of 100 parts resin to 30 part hardener. Again, the ratio must be exactly right.
It is a good practice to transfer the mixed resin to another container before using it. This avoids the risk of applying unmixed resin from the sides of the mixing cup to the repair.
Brush a thin layer of resin onto the dry fabric, just enough to wet it out. Next, wrap the carbon fibre around the pole again and dab the fabric with your brush to wet it out again, applying a little more resin if necessary. Complete the process for the remaining number of wraps around the pole.
12. Wrap the repair with shrink-tape
Next you want to spiral wrap the whole repair with the special Hi Shrink heat-shrink tape supplied.
To do this, stick one end of long length of the tape to the pole (using normal sticky tape) on part of the pole not wet from resin. Spiral wrap the Hi Shrink tape all the way around the repair until past the other end of the repair. Secure the tape using another bit of normal sticky tape.
13. Heat shrink-tape with a heat gun
Use a heat gun, or a hair dryer with a very high heat setting to heat the tape so that it starts to contract. This special Hi Shrink tape will contract by up to 20% at 80°C. This will compress the whole area of the repair, squeezing out any excess resin and resulting in a very strong repair.
14. Leave to fully cure (around 8hrs)
Leave the part to cure for a period of around 8-12hrs in an ambient temperature of 20°C.
15. Remove the shrink tape
Once the part has cured, remove the Hi Shrink tape. You now have a full strength repair.
16. Rub smooth with abrasive paper
At this stage, you could leave the repair as it is, or, you could choose to use the included abrasive papers to smooth and polish the repair. If you choose to do this, start with the 120 grit, then progress to 240 and so on. You can use the abrasive papers with water to stop them from clogging.
When sanding the repair, we very careful not to sand the original parts of the tube as this will reduce their wall thickness and make them weak.
Only sand the new repaired area and only remove as little material as you can to leave you with the finish you require.
Included in the kit there is even some polishing compound so that you can finish the repair to a smooth shiny gloss.
DISCUSSION (5)
Please share any questions or comments you may have about this video tutorial.
LEAVE A COMMENT OR QUESTION
PRODUCTS USED IN THIS PROJECT
Although not necessarily an exhaustive list, the following tools and materials, supplied by Easy Composites, were used in this project.
The quantity shown below is the approximate amount used in the project rounded up to the nearest available kit size or quantity.
MATERIALS & CONSUMABLES
REINFORCEMENTS
DISCUSSION (5)
Please share any questions or comments you may have about this video tutorial.
LEAVE A COMMENT OR QUESTION
100% SECURE
PAYMENT METHODS
Easy Composites EU B.V., registered in the Netherlands 73601195. All content copyright (C) Easy Composites Ltd, 2025. All rights reserved.