Hulp of advies nodig?![]() +44 (0)1782 454499
+44 (0)1782 454499
PRODUCTEN DIE IN DIT PROJECT ZIJN GEBRUIKT
Hoewel het niet per se een uitputtende lijst is, werden de volgende gereedschappen en materialen, geleverd door Easy Composites, in dit project gebruikt.
De hieronder getoonde hoeveelheid is de geschatte hoeveelheid die in het project is gebruikt, afgerond naar de dichtstbijzijnde beschikbare kitgrootte of hoeveelheid.
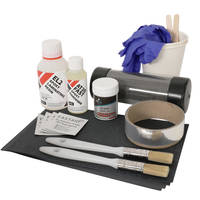
MATERIALEN & VERBRUIKSARTIKELEN
GEREEDSCHAP & APPARATUUR

VERSTERKINGEN
VIDEO-HANDLEIDING
Hoe Repareer je een Beschadigde Koolstofvezel Hengel
Ondanks de sterkte en duurzaamheid van koolstofvezel vishengels en vislijnen, komen breuken of volledige breuken in de hengel van tijd tot tijd voor.
We hebben deze handleiding voor het repareren van een koolstofvezel vishengel gemaakt ter aanvulling op ons product Vishengel Reparatieset, maar, mits u alle benodigde materialen heeft die in deze handleiding worden genoemd, is er geen reden waarom deze niet door iedereen kan worden gevolgd. Als u de kit wilt aanschaffen die bij deze handleiding hoort, zie dan de link aan het einde van het artikel.
OVERZICHT TUTORIAL
1. Wat we nodig hebben om de reparatie uit te voeren
Alles wat hieronder staat is inbegrepen in de Easy Composites Reparatieset voor Visstokken
- 150mm x 1000mm ProFinish platbinding 90g koolstofvezelweefsel
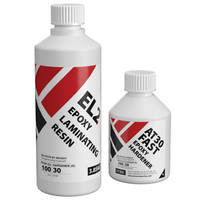
- 154g Epoxyhars
- 46g Epoxy verharder
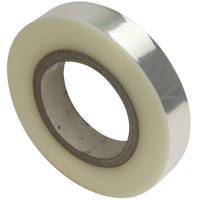
- 10 meter, Hi Shrink composieten krimptape
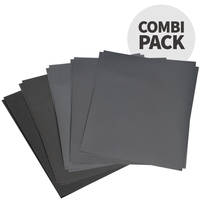
- 120, 240, 400 en 800 korrel schuurpapier
- 2x lamineerborstels, mengbekers en roerstaafjes
- Polijstpasta
- 3x Alcoholdoekjes
Let op: we hebben onze reparatieset voor vishengels geüpgraded met een zeer speciale, lichte en gestabiliseerde ProFinish 90gsm koolstofvezel, waardoor indien nodig zeer lichte reparaties (0,3mm dik) kunnen worden uitgevoerd. Het hars systeem is ook geüpdatet naar de EL2, houd er dus rekening mee dat de mengverhouding nu is gewijzigd naar 100:30.
2. Wat kan er worden gerepareerd?
Gebruik dit proces om een gebroken of verzwakt deel van een hengel te versterken, een hengel die volledig in tweeën is gebroken opnieuw te verbinden of een gat in een hengel te dichten.
3. Voordat u begint - een mal gebruiken voor hengels die in tweeën zijn gebroken
Wanneer een hengel volledig in tweeën is gebroken, is het waarschijnlijk noodzakelijk om de hengel te 'fixeren' om de twee delen van de hengel bij elkaar te houden terwijl de reparatie wordt uitgevoerd. Het ondersteunen van de hengel op deze manier, om toegang rondom de hengel mogelijk te maken tijdens de reparatie, kan het beste worden gedaan met behulp van een eenvoudige mal die moet worden geconstrueerd volgens de plannen aan het einde van deze handleiding voordat u met de reparatie begint.
4. Gebruik schuurpapier om het reparatiegebied op te ruwen
Gebruik een klein stukje van het 120 korrel schuurpapier om het oppervlak van de hengel op te ruwen rond het gebied waar het koolstofvezel 'verband' wordt gewikkeld. Dit zorgt voor een goede 'hechting' voor de reparatie. Doorgaans brengt u het verband aan in een gebied van 60mm (2") voorbij de rand van eventuele schade. Zorg ervoor dat u dit doet bij beide helften van een hengel die in tweeën is gebroken.
5. Ontvet het reparatiegebied met een alcoholdoekje
Gebruik een van de kleine alcoholdoekjes om het gehele reparatiegebied af te vegen. Dit zorgt ervoor dat u vet van uw vingers verwijdert dat voorkomt dat de hars goed hecht aan de hengel of stok.
6. Hengel uitlijnen (indien nodig) met behulp van mal
Als u een hengel repareert die in tweeën is gebroken, moet u de twee helften van de hengel aan weerszijden van de plaats waar de reparatie zal worden uitgevoerd, uitlijnen en ondersteunen.
Hiervoor stellen we voor om een mal te construeren zoals weergegeven in de plannen aan het einde van deze handleiding. Nadat u uw eenvoudige mal hebt gemaakt, zet u de twee helften van de hengel vast en zorgt u ervoor dat ze correct zijn uitgelijnd.
7. Hars mengen voor 'hechtlaag'
Het harssysteem is ook geüpdatet naar de EL2, dus houd er rekening mee dat de mengverhouding nu is gewijzigd naar 100:30
Vervolgens brengen we een dunne laag hars aan op de hengel en laten we deze uitharden tot een kleeflaag. Dit geeft ons een kleverig oppervlak om de koolstof later op aan te brengen.
Gebruik een van de meegeleverde bekers en meng nauwkeurig een zeer kleine hoeveelheid hars met verharder in een verhouding van 100 delen hars op 30 delen verharder. Het is zeer belangrijk dat deze verhouding zo nauwkeurig mogelijk wordt aangehouden.
33g hars en 10g verharder zou voldoende moeten zijn voor een reparatie van gemiddelde grootte.
Neem de tijd en meng de hars grondig. Niet-gemengde hars zal niet uitharden. Het is een goede gewoonte om de gemengde hars over te brengen naar een andere container voordat u deze gebruikt. Dit voorkomt het risico dat niet-gemengde hars van de zijkanten van de mengbeker op de reparatie wordt aangebracht.
8. Opzij zetten om gedurende ongeveer 4 uur uit te harden
U moet nu ongeveer 4 uur wachten (iets meer of minder in warme of koude omgevingen) totdat de eerste harslaag bijna is uitgehard. Wanneer de hars stevig maar nog steeds kleverig is (d.w.z. u kunt er een vingernagel in drukken, maar het is niet nat aan uw vinger), dan bent u klaar om verder te gaan.
9. Knip koolstofvezel voor reparatieverband
Gebruik een normale huishoudschaar om een stuk koolstofvezelweefsel te knippen op een formaat waarmee u het ongeveer 60mm voorbij beide zijden van het beschadigde gebied kunt laten uitsteken. Vervolgens moet u voldoende stof overlaten om ongeveer 3 keer rond de buis of staaf te lopen. Dit resulteert in een reparatie van ongeveer 0,75mm dik.
10. Koolstofvezel om de hengel wikkelen
Neem het stuk gesneden koolstofvezelweefsel, lijn het weefsel langs de hengel uit en druk de voorrand ervan op de hechtende hars.
Druk het met uw vingers aan zodat het stevig vast komt te zitten. Wikkel de koolstof eenmaal rond de hengel en laat het overtollige materiaal naar beneden hangen.
11. Doordrenk de stof met een nieuwe harsmix
Meng met behulp van een nieuwe beker nauwkeurig een iets grotere hoeveelheid hars en de juiste hoeveelheid harder in een verhouding van 100 delen hars op 30 delen harder. Nogmaals, de verhouding moet exact kloppen.
Het is een goede gewoonte om de gemengde hars over te brengen naar een andere container voordat u deze gebruikt. Dit voorkomt het risico dat u ongemengde hars van de zijkanten van de mengbeker op de reparatie aanbrengt.
Breng een dunne laag hars aan op de droge stof, net genoeg om deze te doordrenken. Wikkel vervolgens de koolstofvezel opnieuw om de paal en dep de stof met uw borstel om deze opnieuw te doordrenken, waarbij u indien nodig iets meer hars aanbrengt. Voltooi dit proces voor het resterende aantal wikkelingen rond de paal.
12. Wikkel de reparatie in krimptape
Vervolgens wikkelt u de hele reparatie spiraalsgewijs in met de speciale Hi Shrink-krimptape die wordt meegeleverd.
Om dit te doen, plakt u een uiteinde van een lang stuk tape op de paal (met behulp van normale plakband) op een deel van de paal dat niet nat is van de hars. Wikkel de Hi Shrink-tape spiraalsgewijs helemaal rond de reparatie tot voorbij het andere uiteinde van de reparatie. Zet de tape vast met een ander stukje normale plakband.
13. Verhit de krimptape met een heteluchtpistool
Gebruik een heteluchtpistool of een föhn met een zeer hoge warmtestand om de tape te verwarmen, zodat deze begint samen te trekken. Deze speciale Hi Shrink-tape krimpt tot 20% bij 80°C. Dit comprimeert het hele gebied van de reparatie, waardoor overtollige hars eruit wordt geperst en een zeer sterke reparatie ontstaat.
14. Laat volledig uitharden (ongeveer 8 uur)
Laat het onderdeel gedurende ongeveer 8-12 uur uitharden bij een omgevingstemperatuur van 20°C.
15. Verwijder de krimptape
Zodra het onderdeel is uitgehard, verwijdert u de Hi Shrink-tape. U hebt nu een volledig sterke reparatie.
16. Schuur glad met schuurpapier
In dit stadium kunt u de reparatie laten zoals hij is, of u kunt ervoor kiezen om de meegeleverde schuurpapieren te gebruiken om de reparatie glad te maken en te polijsten. Als u hiervoor kiest, begin dan met de korrel 120 en ga dan verder met 240, enzovoort. U kunt het schuurpapier met water gebruiken om te voorkomen dat het verstopt raakt.
Wees bij het schuren van de reparatie erg voorzichtig dat u de originele delen van de buis niet schuurt, omdat dit hun wanddikte vermindert en ze zwak maakt.
Schuur alleen het nieuwe gerepareerde gebied en verwijder zo min mogelijk materiaal om de gewenste afwerking te krijgen.
De kit bevat zelfs polijstmiddel, zodat u de reparatie kunt afwerken tot een gladde, glanzende glans.
DISCUSSIE (5)
Deel al uw vragen of opmerkingen over deze videohandleiding.
EEN OPMERKING OF VRAAG ACHTERLATEN
PRODUCTEN DIE IN DIT PROJECT ZIJN GEBRUIKT
Hoewel het niet per se een uitputtende lijst is, werden de volgende gereedschappen en materialen, geleverd door Easy Composites, in dit project gebruikt.
De hieronder getoonde hoeveelheid is de geschatte hoeveelheid die in het project is gebruikt, afgerond naar de dichtstbijzijnde beschikbare kitgrootte of hoeveelheid.
MATERIALEN & VERBRUIKSARTIKELEN
GEREEDSCHAP & APPARATUUR
VERSTERKINGEN
DISCUSSIE (5)
Deel al uw vragen of opmerkingen over deze videohandleiding.
EEN OPMERKING OF VRAAG ACHTERLATEN
100% VEILIG
BETAALMETHODEN
Easy Composites EU B.V., geregistreerd in Nederland 73601195. Alle inhoud auteursrecht (C) Easy Composites Ltd, 2025. Alle rechten voorbehouden.