Hulp of advies nodig?![]() +44 (0)1782 454499
+44 (0)1782 454499
VIDEO'S IN DEZE SERIE
Deze video is deel 2 van een 3-delige serie:PRODUCTEN DIE IN DIT PROJECT ZIJN GEBRUIKT
Hoewel het niet per se een uitputtende lijst is, werden de volgende gereedschappen en materialen, geleverd door Easy Composites, in dit project gebruikt.
De hieronder getoonde hoeveelheid is de geschatte hoeveelheid die in het project is gebruikt, afgerond naar de dichtstbijzijnde beschikbare kitgrootte of hoeveelheid.
MATERIALEN & VERBRUIKSARTIKELEN
GEREEDSCHAP & APPARATUUR
VIDEO-HANDLEIDING
Hoe je een Complexe Split/Meerdelige Mal voor Composieten Maakt
Volg deze stapsgewijze handleiding om een composiet patroon te nemen en een nauwkeurige, meerdelige split-mould te maken voor glasvezel/GRP/FRP/composieten.
Als u een kopie wilt maken van een bestaand onderdeel (of origineel ontwerppatroon) in een composietmateriaal zoals glasvezel of koolstofvezel, dan moet u mallen maken van het originele onderdeel of patroon.
Soms betekent de vorm van het onderdeel dat u wilt kopiëren dat u geen eenvoudige mal uit één stuk kunt maken en in dit geval moet u een meerdelige 'split-mould' maken die aan elkaar kan worden vastgeschroefd om het onderdeel te lamineren en vervolgens losgeschroefd en uit elkaar gehaald om het onderdeel te verwijderen.
Als u niet bekend bent met de technieken voor het maken van een meerdelige mal, kan dit proces behoorlijk ontmoedigend zijn, maar in deze professionele video-tutorial nemen we u mee door het volledige proces, van begin tot eind, en demonstreren we de beste werkwijzen voor het produceren van een meerdelige gespleten mal. In deze video maken we een 3-delige gespleten mal voor het airboxpatroon dat we hebben gemaakt in onze Composite Pattern Making Tutorial.
OVERZICHT TUTORIAL
1. Lossingsmiddelen
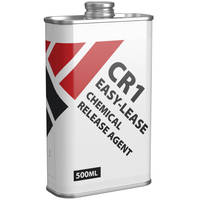
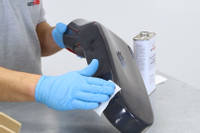
Gedurende het gehele matrijsbouwproces zijn er veel momenten waarop u uw originele onderdelen of model moet voorbereiden met een 'losmiddel' om te voorkomen dat de nieuwe matrijsmaterialen aan uw onderdeel of zelfs aan de nieuwe flenzen van andere delen van de deelmatrijs blijven kleven. In deze handleiding gebruiken we Easy-Lease Chemical Release Agent om een betrouwbare, gemakkelijke lossing te garanderen.
INTRODUCTIE
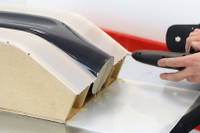
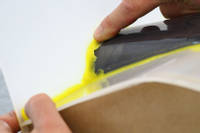
1. Werken met tijdelijke barrières
Op verschillende momenten tijdens het maken van de mal moeten we tijdelijke barrières rond ons patroon of onderdeel plaatsen om flenzen op de maldelen te creëren en eventuele split-lijnen te creëren die we nodig hebben. Tijdelijke barrières kunnen worden gemaakt met behulp van Fluted Sign Board (zoals we deden in deel 1 van onze koolstofvezel Bonnet Making Tutorial), of met behulp van een gladder, steviger materiaal zoals de polypropyleen plaat die we in deze tutorial gebruiken.
Over het algemeen worden bij het maken van split-moulds tijdelijke barrières gebruikt om de flenzen voor één deel van de mal te maken, maar worden ze verwijderd zodra dat deel van de mal is uitgehard, zodat het volgende deel van de split-mould de nieuwe flens van het eerste deel van de mal kan gebruiken als barrière om zijn eigen flens te maken. Dit zorgt ervoor dat de verschillende delen van de mal perfect samenkomen. Bij het gebruik van de flens van een eerder maldeel als barrière om de flens van een nieuw deel te maken, is het natuurlijk erg belangrijk om meerdere lagen lossingsmiddel aan te brengen (alsof het een nieuwe mal is) op de flenzen.
OVERZICHT TUTORIAL
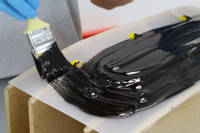
1. Filleting wax gebruiken
Filleting wax wordt gedurende het hele proces gebruikt om gaten tussen barrières en het onderdeel op te vullen en om zachtere radii te creëren waar nodig. Filleting wax wordt ook gebruikt om 'registratiepunten' te creëren die op barrières of flenzen worden geplaatst om overeenkomende mannelijke en vrouwelijke nokken te creëren die helpen om verschillende delen van de mal nauwkeurig te lokaliseren, zodat ze perfect zijn uitgelijnd.
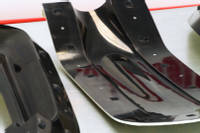
2. Uni-Mould materialen voor het maken van mallen
In deze tutorial zijn alle drie de delen van de meerdelige mal gemaakt met behulp van ons Uni-Mould Universal Mould Making System. Uni-Mould is een speciaal gereedschapssysteem dat compatibel is met het breedst mogelijke scala aan processen, betrouwbaar loslaat van de meeste materialen, waaronder polyester, vinylester en epoxy patronen, en vervolgens kan worden gebruikt om onderdelen te produceren met behulp van al deze hars systemen.
We verkopen het Uni-Mould systeem in een complete starterskit inclusief alle harsen, katalysator, chopped strand glas en lamineergereedschappen of alle afzonderlijke onderdelen kunnen afzonderlijk worden aangeschaft. Voor gedetailleerde informatie over het gebruik van het Uni-Mould systeem, zie onze Uni-Mould Voordelen en Lamineergids PDF.
3. Gebruik met prepregs
Hoewel het mogelijk is om Uni-Mould mallen te gebruiken met prepregs die buiten de autoclaaf (ovenharding) worden gebruikt (zoals XPREG® XC110), raden we Uni-Mould mallen niet langer aan voor dit doel.
In plaats daarvan – voor prepreg gebruik – worden betere resultaten bereikt met behulp van hoge temperatuur epoxy mallen gemaakt met ons EG160 / EMP160 tooling systeem of XPREG® XT135 Tooling Prepreg. Deze hoge temperatuur epoxy tooling systemen zorgen ervoor dat de prepreg kan worden uitgehard bij de optimale 120°C, wat de uithardingstijd verkort en de mechanische eigenschappen van het onderdeel verbetert. Bovendien is gebleken dat epoxy mallen resulteren in een betere oppervlakteafwerking met prepregs zoals XPREG® XC110.
DISCUSSIE (18)
Deel al uw vragen of opmerkingen over deze videohandleiding.
EEN OPMERKING OF VRAAG ACHTERLATEN
PRODUCTEN DIE IN DIT PROJECT ZIJN GEBRUIKT
Hoewel het niet per se een uitputtende lijst is, werden de volgende gereedschappen en materialen, geleverd door Easy Composites, in dit project gebruikt.
De hieronder getoonde hoeveelheid is de geschatte hoeveelheid die in het project is gebruikt, afgerond naar de dichtstbijzijnde beschikbare kitgrootte of hoeveelheid.
MATERIALEN & VERBRUIKSARTIKELEN
GEREEDSCHAP & APPARATUUR
DISCUSSIE (18)
Deel al uw vragen of opmerkingen over deze videohandleiding.
EEN OPMERKING OF VRAAG ACHTERLATEN
100% VEILIG
BETAALMETHODEN
Easy Composites EU B.V., geregistreerd in Nederland 73601195. Alle inhoud auteursrecht (C) Easy Composites Ltd, 2025. Alle rechten voorbehouden.