Hulp of advies nodig?![]() +44 (0)1782 454499
+44 (0)1782 454499
PRODUCTEN DIE IN DIT PROJECT ZIJN GEBRUIKT
Hoewel het niet per se een uitputtende lijst is, werden de volgende gereedschappen en materialen, geleverd door Easy Composites, in dit project gebruikt.
De hieronder getoonde hoeveelheid is de geschatte hoeveelheid die in het project is gebruikt, afgerond naar de dichtstbijzijnde beschikbare kitgrootte of hoeveelheid.
VERSTERKINGEN
VIDEO-HANDLEIDING
Hoe Maak je een met Koolstofvezel Omwikkelde Buis?
In deze tutorial leer je hoe je een metalen doorn, prepreg koolstofvezel en krimptape kunt gebruiken om een op maat gemaakte koolstofvezel buis te produceren met behulp van het rolwikkelproces.
Het wikkelproces wordt door composietfabrikanten gebruikt om koolstofvezel buizen met een hoge sterkte te produceren, hetzij met een basis onafgewerkte uitstraling, hetzij met een cosmetisch afgewerkte uitstraling. Easy Composites heeft zelfs een van de grootste assortimenten gewikkelde koolstofvezel buizen die online te koop zijn. Soms is er echter behoefte aan een koolstofvezel buis met zeer specifieke afmetingen, vezeltype/oriëntatie of uiterlijk.
Mits de buis die je wilt maken parallelle zijden of een continue tapsheid heeft, is het mogelijk om het rolwikkelproces te gebruiken om je eigen op maat gemaakte koolstofvezel buis te maken zonder dat je specialistische machines nodig hebt, behalve een metalen doorn van de juiste maat en een oven die groot genoeg is om de buis in uit te harden.
Als je in plaats daarvan een koolstofvezel buis moet maken die niet recht is, zoals een stuur of een complexere buisvormige framestructuur zoals een draagarm van een ophanging of een fietsframe, bekijk dan onze tutorial over het maken van een koolstofvezel buis met behulp van een tweedelige mal.
Hieronder worden de materialen en processen uitgelegd die in de tutorial worden gebruikt.
OVERZICHT TUTORIAL
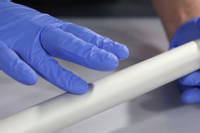
1. Metalen doorn
Het rolwikkelproces omvat het wikkelen van prepreg koolstofvezel rond een metalen doorn en het uitgangspunt is dus een metalen doorn te hebben met de juiste diameter voor de maat buis die je wilt maken. Omdat de koolstofvezel om de buitenkant van de doorn wordt gewikkeld, moet de doorn zelf een buitendiameter hebben die overeenkomt met de binnendiameter van de koolstofvezel buis die je ermee gaat maken. De buitendiameter van je koolstofvezel buis wordt bepaald door de hoeveelheid versteviging (het aantal lagen) dat je om de doorn wikkelt.
In de video gebruiken we een aluminium doorn omdat de hoge thermische uitzettingscoëfficiënt (CTE) van aluminium hem zeer geschikt maakt voor het rolwikkelproces. Staal of andere metalen kunnen worden gebruikt, maar metalen met een hogere CTE zullen het proces gemakkelijker maken.
Als je een taps toelopende koolstofvezel buis wilt produceren, moet je waarschijnlijk een draaibank gebruiken om een massieve aluminium staaf af te draaien om een taps toelopende doorn te maken.
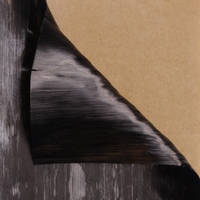
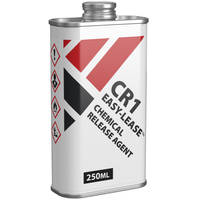
Als je eenmaal een doorn van de juiste maat hebt, zorg er dan voor dat deze helemaal schoon en zo glad mogelijk is om het extraheren te vergemakkelijken. Vervolgens moet de doorn grondig worden geprepareerd met een chemisch lossingsmiddel bij hoge temperatuur, zoals Easy-Lease.
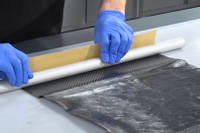
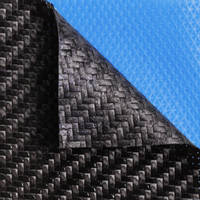
2. Prepreg koolstofvezel
Hoewel het in theorie mogelijk is om alternatieve soorten verstevigingen te gebruiken, zoals een droge stof die is bevochtigd met een epoxyhars, biedt in de praktijk alleen prepreg koolstofvezel de precisie en het gebruiksgemak dat vereist is voor het rolwikkelproces.
In de tutorial gebruiken we een laag XPREG® XC110 210g geweven prepreg aan de binnenkant van de buis, gevolgd door verschillende lagen XC130 300g unidirectionele prepreg, afgewerkt met een laatste laag van de XC110 210g geweven prepreg weer aan de buitenkant van de buis. Omdat de geweven prepreg vezels heeft die zijn georiënteerd in de 0°-as (in de lengte van de buis) en in de 90°-as (rond de omtrek van de buis), voegen deze lagen wat bekend staat als hoepelsterkte toe aan de buis, waardoor de buis minder kwetsbaar is voor druk- of barstkrachten en versplintering. Het grootste deel van de versteviging, in de 0°-as, geeft de buis zijn longitudinale stijfheid.
Door de layup te wijzigen om meer of minder geweven lagen op te nemen of door de oriëntatie van de unidirectionele lagen te veranderen of af te wisselen, kan de prestatie van de buis nauwkeurig worden geoptimaliseerd voor het specifieke gebruik. Een buis voor een cardanas zal bijvoorbeeld voornamelijk torsiekrachten ondervinden en dus kan de unidirectionele vezel off-axis worden uitgelijnd, bijvoorbeeld onder 45°, specifiek om deze krachten te weerstaan.
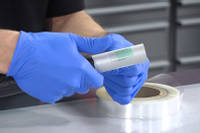
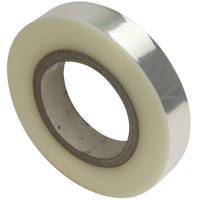
3. Composieten krimptape
Zodra de prepreg koolstof weefsel zo strak mogelijk om de doorn is gewikkeld, wordt de versteviging vervolgens strak omwikkeld met een composiet krimptape om verdere consolidatie te bieden.
Bij het aanbrengen van de krimptape is het belangrijk om ervoor te zorgen dat er veel overlap is. Elke wikkeling van de tape schuift slechts een paar millimeter over de buis. Hoewel het tijdrovend is om met de hand te doen, zorgt veel overlap op deze manier voor veel meer consolidatiedruk wanneer de tape samentrekt tijdens de uitharding.
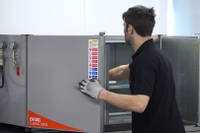
4. Uitharding in de oven
Naast de doorn is het hebben van een oven om de buis in uit te harden waarschijnlijk de belangrijkste beperkende factor bij het overwegen van het wikkelproces buiten een volledige productieomgeving. In tegenstelling tot andere prepreg processen vereist het wikkelproces echter geen nauwkeurige temperatuurregeling of de meerstaps 'ramp and soak' uithardingscycli die vaak nodig zijn. Het proces vereist ook geen actieve vacuümleiding naar de oven. Daarom zijn de enige vereisten voor een oven om gewikkelde buizen uit te harden een basis temperatuurregeling en voldoende grootte om de buis erin te passen. Afhankelijk van de grootte van de buis die u wilt maken, kan alles van een huishoudoven tot een poedercoatingoven worden gebruikt.
In de video tutorial gebruiken we onze OV301 precisie composieten uithardingsoven. De XPREG XC110 prepreg wordt in de oven geladen op 120°C, vlakke temperatuur, en mag 1 uur en 30 minuten uitharden.
DISCUSSIE (34)
Deel al uw vragen of opmerkingen over deze videohandleiding.
Het kan zeker als een natte laminering bij kamertemperatuur worden gedaan. Met prepreg, zoals in de video, kan het zijn dat voor de meeste standaard pultrusiebuizen de uithardingstemperatuur de hittebestendigheid van de buis overschrijdt, waardoor deze zachter kan worden, kan vervormen of zelfs kan worden geplet tijdens de uithardingscyclus.
Het fabricageproces voor een cardanas zou heel goed vergelijkbaar kunnen zijn met het proces dat in deze video wordt getoond, hoewel de vezeloriëntatie heel anders zou zijn. Voor toepassingen met een hoog koppel zou je willen dat het grootste deel van de vezel in een spiraal rond de buis loopt (bijvoorbeeld 45 graden) om het koppel zo effectief mogelijk te weerstaan. De eindfittingen kunnen aan de buis worden gelijmd met behulp van verschillende lapconfiguraties (enkele lap, dubbele lap, pocket lap enz.) of kunnen zelfs zo worden ontworpen dat ze op dat moment in de buis worden gelamineerd (waardoor de eindfittingen mechanisch in het laminaat worden vastgezet).
Voor meer conventionele toepassingen, zoals de veerpootbrug, zouden de eindfittingen gewoon op de uiteinden van de buis worden gelijmd, wederom met behulp van verschillende lapconfiguraties, afhankelijk van de vereisten.
Hallo Joel, nee, helaas werkt dit proces niet voor iets anders dan een perfect rechte (hoewel deze taps toelopend kan zijn) buis. Alles met zelfs maar een lichte kromming zou onmogelijk van de doorn te verwijderen zijn.
De 'professionele' manier om een gebogen buis te maken, vereist een buitenmal die opengeklapt kan worden. Qua processen is het een stuk ingewikkelder. Als je hier meer over wilt weten, hebben we al een video-tutorial gemaakt over het maken van een koolstofvezel buis met behulp van een split mould.
Een meer basale methode, zij het met enkele compromissen, zou zijn om een soort offerdoorn te gebruiken die je naar wens kunt vormen, en daar vervolgens koolstofvezel en hars omheen te lamineren. Zodra de hars volledig is uitgehard, verwijder je de doorn. Het is een beetje rommelig, maar een van de eenvoudigste manieren om dit te bereiken is door XPS (geëxpandeerd polystyreen schuim) te gebruiken om de doorn te maken, deze vervolgens in wat lossingsfolie te wikkelen, en vervolgens droge koolstofvezeldoek en epoxylamineerhars rond de doorn te lamineren voordat je het geheel in krimptape wikkelt, zoals je ons in deze tutorial ziet gebruiken. Zodra alles is uitgehard, kun je een oplosmiddel zoals aceton gebruiken om het schuim op te lossen. De lossingsfolie trek je er dan uit en je houdt een holle, uitgeharde bijlsteel over.
Ik denk dat ik voor de volledigheid ook moet vermelden dat een andere optie zou zijn om de schuimkern erin te laten (als je hiervoor kiest, zou je je niet druk maken om de releasefilm). Een XPS-kern zou slechts een paar gram wegen, dus het is misschien geen probleem om hem erin te laten en het extra werk te besparen.
EEN OPMERKING OF VRAAG ACHTERLATEN
PRODUCTEN DIE IN DIT PROJECT ZIJN GEBRUIKT
Hoewel het niet per se een uitputtende lijst is, werden de volgende gereedschappen en materialen, geleverd door Easy Composites, in dit project gebruikt.
De hieronder getoonde hoeveelheid is de geschatte hoeveelheid die in het project is gebruikt, afgerond naar de dichtstbijzijnde beschikbare kitgrootte of hoeveelheid.
VERSTERKINGEN
DISCUSSIE (34)
Deel al uw vragen of opmerkingen over deze videohandleiding.
Het kan zeker als een natte laminering bij kamertemperatuur worden gedaan. Met prepreg, zoals in de video, kan het zijn dat voor de meeste standaard pultrusiebuizen de uithardingstemperatuur de hittebestendigheid van de buis overschrijdt, waardoor deze zachter kan worden, kan vervormen of zelfs kan worden geplet tijdens de uithardingscyclus.
Het fabricageproces voor een cardanas zou heel goed vergelijkbaar kunnen zijn met het proces dat in deze video wordt getoond, hoewel de vezeloriëntatie heel anders zou zijn. Voor toepassingen met een hoog koppel zou je willen dat het grootste deel van de vezel in een spiraal rond de buis loopt (bijvoorbeeld 45 graden) om het koppel zo effectief mogelijk te weerstaan. De eindfittingen kunnen aan de buis worden gelijmd met behulp van verschillende lapconfiguraties (enkele lap, dubbele lap, pocket lap enz.) of kunnen zelfs zo worden ontworpen dat ze op dat moment in de buis worden gelamineerd (waardoor de eindfittingen mechanisch in het laminaat worden vastgezet).
Voor meer conventionele toepassingen, zoals de veerpootbrug, zouden de eindfittingen gewoon op de uiteinden van de buis worden gelijmd, wederom met behulp van verschillende lapconfiguraties, afhankelijk van de vereisten.
Hallo Joel, nee, helaas werkt dit proces niet voor iets anders dan een perfect rechte (hoewel deze taps toelopend kan zijn) buis. Alles met zelfs maar een lichte kromming zou onmogelijk van de doorn te verwijderen zijn.
De 'professionele' manier om een gebogen buis te maken, vereist een buitenmal die opengeklapt kan worden. Qua processen is het een stuk ingewikkelder. Als je hier meer over wilt weten, hebben we al een video-tutorial gemaakt over het maken van een koolstofvezel buis met behulp van een split mould.
Een meer basale methode, zij het met enkele compromissen, zou zijn om een soort offerdoorn te gebruiken die je naar wens kunt vormen, en daar vervolgens koolstofvezel en hars omheen te lamineren. Zodra de hars volledig is uitgehard, verwijder je de doorn. Het is een beetje rommelig, maar een van de eenvoudigste manieren om dit te bereiken is door XPS (geëxpandeerd polystyreen schuim) te gebruiken om de doorn te maken, deze vervolgens in wat lossingsfolie te wikkelen, en vervolgens droge koolstofvezeldoek en epoxylamineerhars rond de doorn te lamineren voordat je het geheel in krimptape wikkelt, zoals je ons in deze tutorial ziet gebruiken. Zodra alles is uitgehard, kun je een oplosmiddel zoals aceton gebruiken om het schuim op te lossen. De lossingsfolie trek je er dan uit en je houdt een holle, uitgeharde bijlsteel over.
Ik denk dat ik voor de volledigheid ook moet vermelden dat een andere optie zou zijn om de schuimkern erin te laten (als je hiervoor kiest, zou je je niet druk maken om de releasefilm). Een XPS-kern zou slechts een paar gram wegen, dus het is misschien geen probleem om hem erin te laten en het extra werk te besparen.
EEN OPMERKING OF VRAAG ACHTERLATEN
100% VEILIG
BETAALMETHODEN
Easy Composites EU B.V., geregistreerd in Nederland 73601195. Alle inhoud auteursrecht (C) Easy Composites Ltd, 2025. Alle rechten voorbehouden.